Presentation Mode
The presentation mode allows you to give your patch a different look for performing or when presenting (with) it. For example, you can add all elements used as user input or visual feedback to it, while leaving the complicated rest out. Also, you can arrange those objects just like you want without changing their original position in the edit and locked modes. Think of using presentation mode as a way to design the ideal performance-interface to your patch. In the presentation mode, you position objects in a way that they are usable. In the edit mode, you position them in a way that they are understandable and placed natural in the flow of the data…
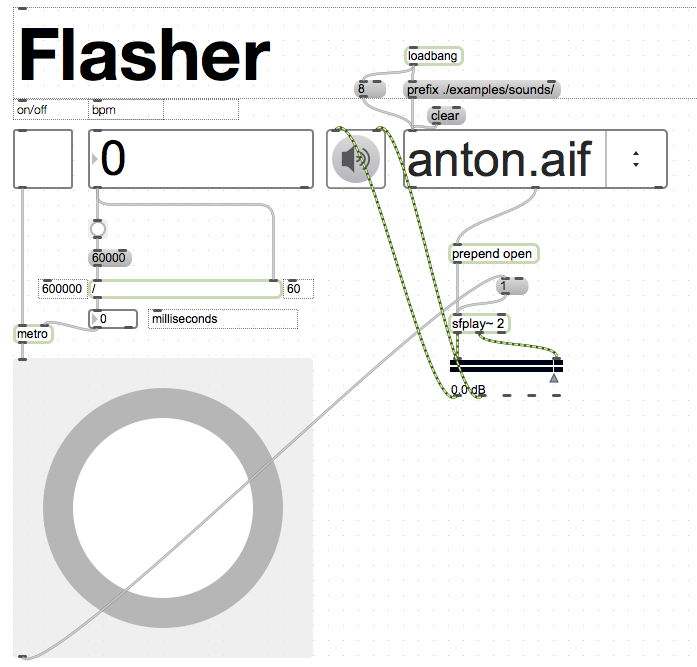
Remember our metronome. By now it should look a bit like this:
We built it in edit mode. For a user it is rather complicated looking. We could hide the unnecessary elements by selecting them and choosing “hide on lock”. But that would result in some weird empty space like this:
This is clearly not a solution.
Let’s use the presentation mode. Select the objects you want to show in the presentation mode (the ones visible above) and right-click and choose “Add to Presentation”, alternatively, press cmd+shift+P. The selected objects will get some holy like red glow.

To enter presentation mode, press the following icon:
![]()
First, it will look exactly the same as when we did hide the other objects. However, in presentation mode we can drag the object to new positions to get rid of the annoying space and make the patch look nicer.
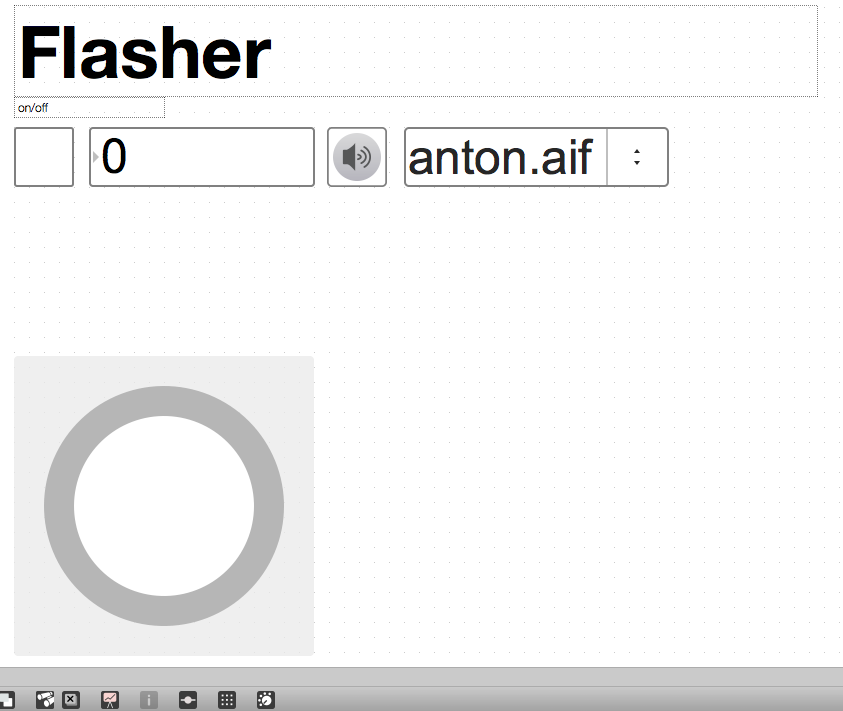
Let’s do that:

Just like we are used to, we can lock the patch to use it.
Leave the presentation mode, and you will see, everything in edit mode is still like we left it:
Encapsulation
Subpatch, Patcher
Encapsulation allows us to place parts of our patch in a subpatch. A subpatch is like having a patch inside a patch. A bit like matryoshka or babushka dolls. You create a subpatch by creatinga so called patcher object. If we double click on the patcher, a new empty patch seems to open in which we can place objects and connect them just like in our main patch. The special thing is, that this patch is placed within our main patch. The patcher object will then do exactly what the objects inside it are meant to do. In order for it to communicate with the main patch, we can ad inputs and outputs to the subpatch. Putting parts of our patch into subpatches allows us to hide parts of the patch we do not need to see. Sometimes pictures says much more than words.
Let’s go back to the metronome we just built.
The patch includes a calculation: the beats per minute (bpm) are converted into milliseconds (ms) because the [metro] object uses ms as its argument. We can put the calculation into a subpatch to make the patch more clear.
We add a new object and type [p nameOfTheSubpatcher]. In our case, let’s type [p bpm2ms].
Automatically, a new empty patcher opens. That’s our subpatch. We can also open it by double-clicking on the sub patch. Now, we have to make sure the main patch can send its values into the subpatch and the subpatch can pass its calculated values back to the main patch. We do that by adding inlets and outlets to the sub patch. Furthermore, we copy the calculation from the main patch into the sub patch.
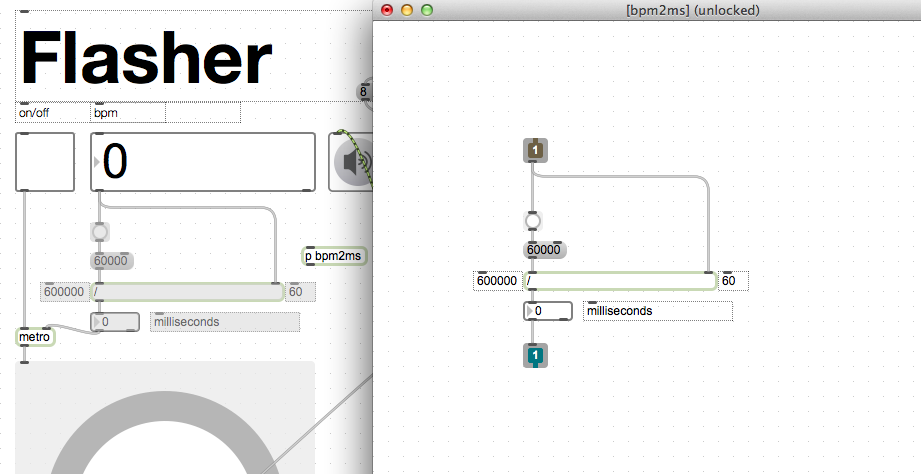
By adding the brown inlet and greenish outlet, our [p bpm2ms] object got little inlets and an outlet as well. Also, the inlets are numbered, so we know which inlet goes where in out subpatch. We can now close the subpatch and connect it in our main patch:
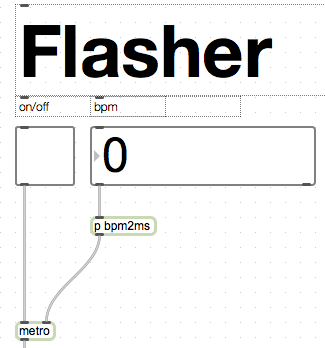
This is much cleaner already, we know exactly where to look and change something, if we want to modify the calculation. A subpatch is also useful if you want to use the same kind of complex processes at several positions in your patch without getting the patch crowdy. You just can copy paste the patcher and use it at several spots within the main patch.
Abstractions
Abstractions are also a form of encapsulation. They take the idea of putting some functionality into a subpatch one step further. We will create our own abstraction. An abstraction gives us the possibility to have something like a subpatch in a separate, reusable file. Once saved as a separate file, abstractions can be loaded in any Max patch you build just like the built in objects. Let’s build an abstraction which converts bpm to ms in any patch….
We open a new patcher and add this:
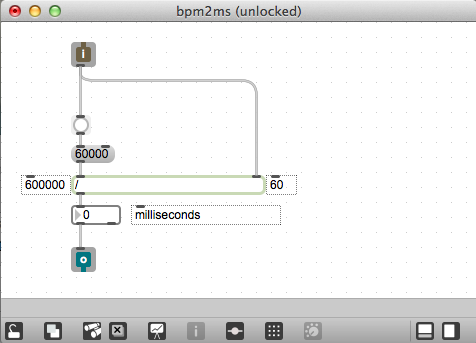
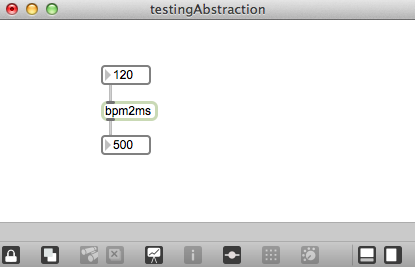
We save this patch under the name “bpm2ms.maxpat” on our hard disk in the folder “MaxWeek3″ (or any other folder you want to use for this week’s stuff). Now, we open a new patcher and also save it in the same folder under any name you want (e.g. testingAbstractions).
In this new file, we add two integer number boxes and add our own abstraction in the middle. We do this just like adding any other object: We add a new object and type the name [bpm2ms] into it. You see an object appears. This is the object we built. It has one inlet and one outlet. We connect it with the number boxes.
You can also double click on the [bpm2ms] to see its content. If you want to change the object, you will have to change the orginal file. It will affect all patches which use it.
Tipp: You can make a folder for all your abstractions and add it to the folder Max will know about: Go to options–>File Preferences to do so. Click the little plus at the left bottom corner.
Copy Paste and Share code
Sometimes you want to share snippets of code with other people, e.g. when chatting online about a problem with your class mates or when asking for help on a forum. In that case, you can just copy the part of the patch you want to share with cmd+c. And paste it online, or in an email or any textfield, in text form. A simple “Hello world” example will look like this:
{
 "boxes" : [ {
 "box" : {
 "maxclass" : "comment",
 "text" : "<-- click here",
 "numoutlets" : 0,
 "fontname" : "Arial",
 "patching_rect" : [ 195.0, 45.0, 150.0, 20.0 ],
 "fontsize" : 12.0,
 "id" : "obj-4",
 "numinlets" : 1
 }

 }
, {
 "box" : {
 "maxclass" : "newobj",
 "text" : "print",
 "numoutlets" : 0,
 "fontname" : "Arial",
 "patching_rect" : [ 105.0, 90.0, 34.0, 20.0 ],
 "fontsize" : 12.0,
 "id" : "obj-2",
 "numinlets" : 1
 }

 }
, {
 "box" : {
 "maxclass" : "message",
 "text" : "Hello World!",
 "numoutlets" : 1,
 "fontname" : "Arial",
 "outlettype" : [ "" ],
 "patching_rect" : [ 105.0, 45.0, 76.0, 18.0 ],
 "fontsize" : 12.0,
 "id" : "obj-1",
 "numinlets" : 2
 }

 }
 ],
 "lines" : [ {
 "patchline" : {
 "source" : [ "obj-1", 0 ],
 "destination" : [ "obj-2", 0 ],
 "hidden" : 0,
 "midpoints" : [ ]
 }

 }
 ]
}
You do not have to understand this code. You can just copy this text above (and any other pasted max patches) and paste it into your patch. You should see the following appear:

Another way to mention objects in a text is using the [] brackets. E.g. [print] will refer to the print object. I use the latter on this blog.