MSP is the sound-part of Max/MSP/Jitter. Most of the objects we have learned about so far, are Max objects. The MSP objects can easily be distinguished via the ~ (tilde) after their name. The ~looks like a little sound wave, and MSP objects deal with everything related to (sound) signals, so that’s easy to remember. Also, MSP objects are much faster than MAX objects. We have already gotten to know some of the MSP objects in the last lecture when we played sounds with [sfplay~] and also used [gain~] and [ezdac~] for playing back sounds. We have also noticed, that the cords which transport audio-signals are yellow-black and much thicker than the usual think black patch cords we use for sending normal messages.
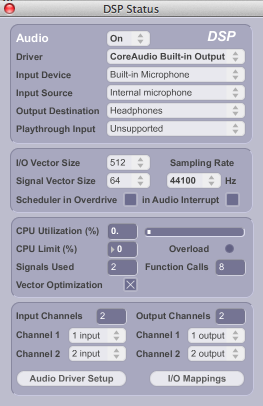
Before starting with sound, let’s have a look if sound is setup correctly. We do that by opening the DSP Status window.
Audio Status window
In the Audio Status window you can control which audio inputs and outputs to use. Also you can control wether the input sound is audible on the speakers or not. You can open the Audio Status window from the Options category in the menu bar. (Hint: When the patch is locked you can open the Audio Status window by double clicking on the [adc~] or the [dac~] object (this doesn’t work for the ezadc~ and ezdac~). When you are in edit mode you have to press the command (apple) key while double clicking the objects.)
It looks like this:
By the way, in older versions of Max, this is called the DSP Status window.
sfrecord~, gain~ and ezdac~
Before looking into new MSP objects, let’s summarize the MSP objects we already know.
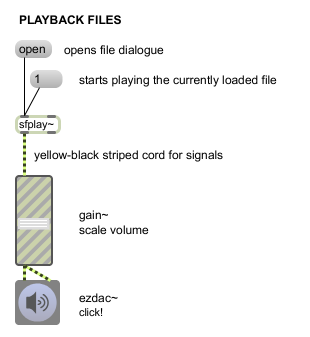
[sfplay~] plays audio files from your disk. It does not play mp3 but .wav and .aif-files are no problem. If you send it the message ‘open’ a file dialogue opens and you can select a file from your drive. To play the file, you have to send it a “1”. Alternatively, it allows you preload different files and access them using cues. There are a lot of options, have a look at the help file. In order to listen to the playback, we have to send the audio-signal to the [ezdac~] and click on it to switch audio on. The [ezdac~] is takes care of the audio output (it is a digital-analogue converter) and can be used as an on and off switch for the audio. It looks like a button with a speaker on it. Because we want to adjust the volume, we put a [gain~] object in between the output of the [sfplay~] and the the input of the [ezdac~]. The gain scales the audio-signal exponentially and looks like a nice fader.
But Max can not only play back files from your harddisk. It can also record files to your disc. The object you need for that is [sfrecord~].
sfrecord~ and ezadc~
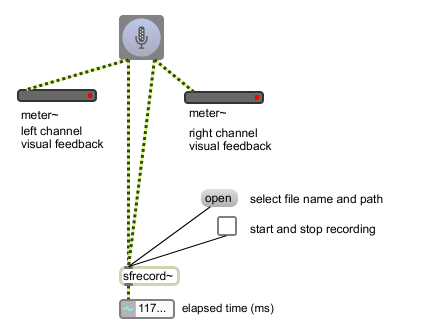
[sfrecord~] is used to record sound files to your hard disk. The setup we need for recording sound reminds us of the setup to play files. However, instead of using the [ezdac~] to output audio, we need something to input audio. This is the [ezadc~], the easy analogue-digital converter. The left outlet is for the left channel and the right outlet for the right channel.We connect it to the input of [sfrecord~]. Sending the message ‘open’ allows us the select a file name and path for the file we will record. Sending a ‘1’ will start recording, a’0′ will stop it. Consequently, we can use a toggle to start and stop recording.

Note, that this results in a mono recording, but we actually could record up to 28 channels at once!
meter~ and number~
We can also add some visual feedback, so we can detect possible problems before listening back to the recording. The [meter~] object gives us feedback about the level of the microfone signals. We also add a [number~] object to the outlet of [sfrecord~]. It will display the amount of ms since we have started the recording (-> the length of the recoding). Be careful, [number~] has two display modes. We are interested in the Signal Monitor Mode which displays the value of the signal received in the left inlet. Clicking on the little icon (tilde or arrow) on the left in the [number~] switches the modes. Make sure it looks like this:
As usual, open the help to find out about more options.
Bonus: Make automatically numberd recordings with one click.
We can use what we have learned so far to make recordings which are started and automatically named with ascending numbers with the switch of just one toggle.

Additionally to record and play back sounds, Max can of course be used to produce sounds. In the following I will give a very quick overview of some options:
cycle~
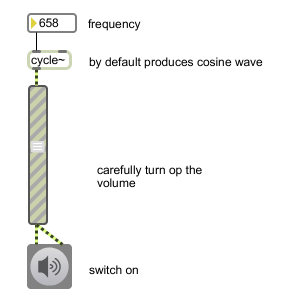
We use [cycle~] to generate our first test tone. [cycle~] is a oscillator that reads repeatedly through one cycle of a waveform. You’ll learn more about what that is and means in the Sound Space Interaction course. Don’t worry if you don’t know it yet. What matters now is that by default, it puts a cosine wave out (which sounds exactly the same as a sine wave!). The left inlet takes a frequency, so you can produce cosine waves in any frequency. You probably know that when young we can hear approximately between 20 and 20000 Hz (herz) but with getting older, you can hear less high. Let’s make a test to find out how high you still can hear. We can play back the cosine wave just like the audio file on our computer. Again, we use [gain~] to adjust the volume.
phasor~
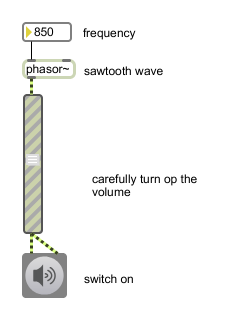
We have used [cycle~] to generate a cosine wave. [phazsor~] is a sawtooth wave generator. It takes a frequency into its left inlet and puts out a sawtooth wave with that frequency. Edwin will tell you much more about the underlying principles. Enjoy some experimenting and compare the audible difference between the previous patch using [cycle~] and this one:
noise~
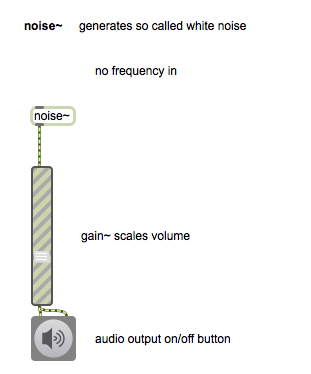
[noise~] is another sound generator. However, this one does not take a frequency. That’s because it generates so called white noise. Formulated a bit too simple, just like white light contains all colors at once, white noise contains all frequencies. Wikipedia formulates it like this: the signal contains equal power within a fixed bandwith at any center frequency. Don’t worry if you don’t understand that yet, but please listen to it. If you were asked if this sounds low, high or like a specific note, you should not be fooled. They are all in there.
