In this exercise we focus on automated actions and on controlling the automations. To achieve this, we build a little metronome. For those who don’t know what a metronome is: it is a device used which produces regular clicks or flashes. The tempo of the regular impulses can be set in beats per minute. Usually a metronome is used by a composer to specifying the intended tempo or used by musicians to get a good idea about how fast a piece should be played. It’s also used to maintain a consistent tempo when practicing. In order to build a metronome which blinks in a specified temo we will get to know the metro object which produces regular bang messages and the toggle object, which we will use to switch the metronome on and off and some very basic math (a simple division).
Let’s start with the user interface. We want an on and off switch, and a number box where the user can tell the metronome the intended tempo in beats per second as inputs and a flash as output.
We use the toggle as an on and off switch. Press n and type ‘toggle’ or double-click and choose the toggle object. Your patch now should look like this:
 Open the help file of the toggle to learn more about it.
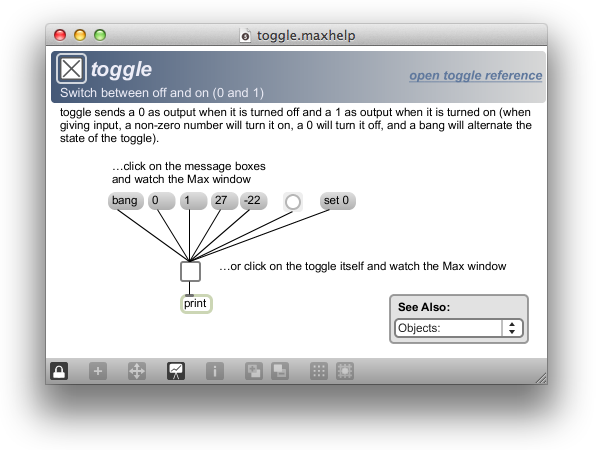
We learn that toggle is a switch which can be used to switch between on (1) and off (off). You can turn the toggle on and of by clicking on it. When the toggle is turned off it sends a 0 as output and when it is turned on is sends a 1 as output. That will do for our purposes. However, there are some more options to turn the toggle on and off: you can send it a bang to switch the state, a 0 to put it off and a 1 to put it on. Its state can also be changed silently using the set-message. Whenever you send other numbers to the toggle, it just passes them on. For now it is important that you can turn the toggle on and off my clicking on it.
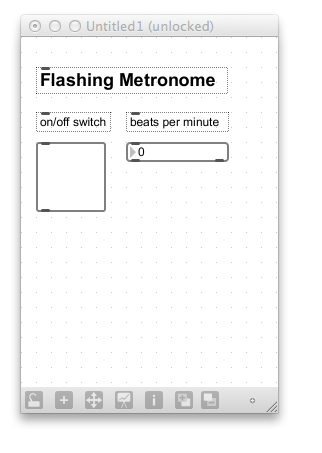
We already have our on and on switch. Let’s add the number box to enter the beats per minute. The integer number box of the last exercise will do. Let’s add it to the patch. Also, don’t forget to add comments (press c) to make your patch easier to understand. Also, you can change the size of the toggle and number box to make it more usable and appealing by clicking on them and dragging the little handle:
We have all the inputs we need. Let’s add the output. We need something which can flash regular. The button flashes whenever it receives a message. Let’s use a big button, to give a clear visual flash on every beat.
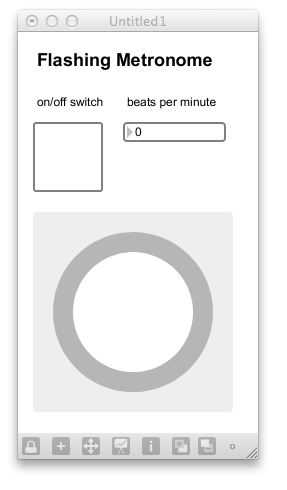 This looks good but lacks functionality. We need something which sends regular messages to our button, in order for it to flash regularly. The metro object can do that for us. Let’s add the metro object to the patch (press n and type ‘metro‘) and open its help patch. The text tells us that metro can serve as a metronome and that metro outputs bangs at regular intervals. The first example of the help patch looks an awful lot like a mini-version of our metronome we are building. It also has a on/off switch, a number box and a button which produces flashes:
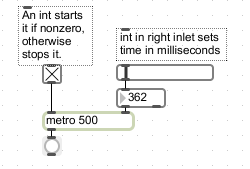
We can learn from that: the toggle is connected to metro’s left inlet, switching it on and off. The number box is connected to the right inlet of the metro and sets the time interval at which metro will output its bangs in milliseconds. There is also a number behind the word metro. This is an argument. It is the initial value for the the time interval at which metro will output its bangs. In this example, metro outputs a bang every 500 milliseconds. That’s twice a second, which is 120 beats per minute.
The main difference between this example and out metronome is that the number box does contain the “milliseconds” and not the “beats per minute”. Consequently, if we want it to have 60 beats per minute, we have to put in 1000 milliseconds in the number box. That will cause the metronome to bang every 1000 milliseconds. That’s every second. That’s 60 times per minute. Let’s use what we have learned from this patch and include the information in our own metronome-patch:
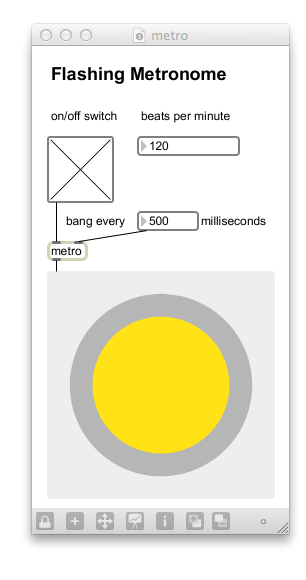
We now have a patchcord from the the toggle to the metro object to put it on and off. We also have a patchcord from an additional number box to the right inlet of the metro to set the time interval at which metro will output its bangs. The metronome already works, but putting in our desired beats er minute does not yet change the speed of the flashing. What is needed is a bit of math to change the beats per minute into the time interval at which metro will output its bangs. In short, we have to put in a calculation which uses the beats per minute to automatically calculate the corresponding time interval.
We already know that 60 bpm (beat per minute) results in 1000 ms. 120 bpm results in 500 ms. What’s the general rule here?
To find that out, we rewrite beats per minute as beats per 60 seconds. This we can rewrite again as beats per 60000 ms. Bpm is nother else than beats per 60000 ms.
We thus have a given duration of 60000 ms. In this timeframe of 600000 ms we want to put a variable amount of beats. To know how much time should pass between those beats are initiated, we divide 60000 by the number of beats we want. If we want two beats, we will have 60000/2 = 30000. Every 30000 ms there wil be a beat (or flash, in our case). If we want 3 beats per 60000ms, we calculate 60000/3= 20000. Every 20000 ms there will be a beat/flash. In general
interval = 60000/bpm.
We can realize this in max using the devide-object. Add a new new object box (press n) and type a slash (/) into it. You just created a divide object.
![]()
Open its help patch. You’ll learn that divide takes any two given numbers, divides them and then outputs the result. As expected, it divides the left input by the right. Really important is, that the left inlet triggers the calculation. This means you first have to put in the number on the right inlet, and then the number on the left. Let’s assume you want to calculate 10/5. You would first input 5 to the right inlet and then 10 to the left. The calculation is automatically triggered when a number (the 10) is received in the left inlet and the result (2) is send through the output. We want to put in 60000 on the right. However, the input for the left inlet is determined by what our user puts inside the number box. We can put in 60000 on the left using a message and connect the output of the number box to the right inlet.
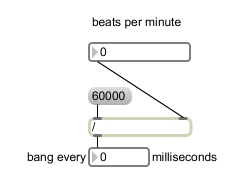
This could work. The only problem is, that we have to click the 60000 message every time after the beats per minute value has changed. That’s because the left inlet triggers the calculation. We can, however, take care of that using an additional bang or even better, a trigger-object. Have a look at the solution:
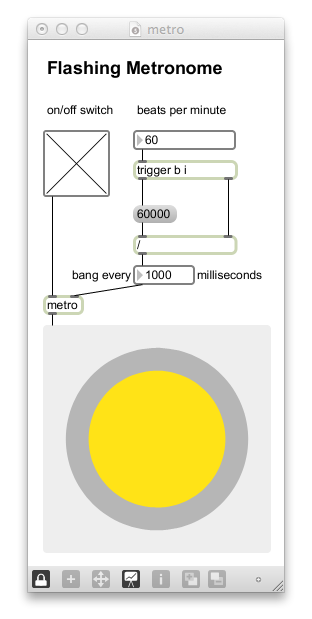
The trigger works from right to left. It takes the integer number as an input and first puts it out formatted according to the object-argument specified. In our case we say “trigger b i“. The letter i represents an integer and the letter b represents a bang. That means, the input is first send out as an integer (trigger b i) on the right outlet and then send out in the format of a bang (trigger b i) on the left outlet. Now, we can be sure the 60000 receives a bang and is send to the left inlet automatically after the right inlet has received its number. Try out the patch and check a few values. It should work flawless.
Congratulations, you have already created a metronome including a user interface, this would have been rather difficult in a traditional programming language.
One only thing which could improve the usability for the end user is by hiding the calculations from the end user. The several boxes might confuse the user. There is an option for that. Select the objects you want to hide when using the metronome.
Then navigate to Object in the menu bar and choose the option “Hide on Lock“. Alternatively, press cmd+K.
If you have chosen to hide the objects involved in the calculation, your locked patch should look like this:
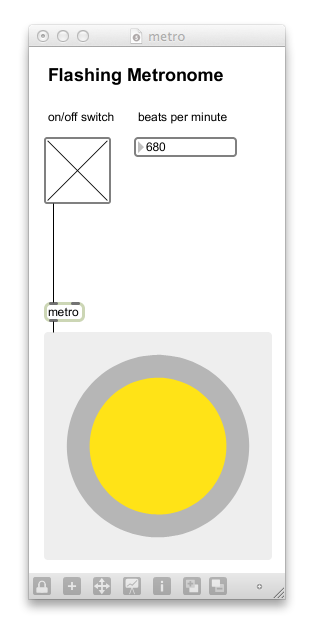 No distracting boxes are left. You can of course undo this via the Object menu or by pressing cmd+L after unlocking your patch. In case hiding objects is not enough and you want to create a completely different view of your patch for the live use, you can also use the presentation mode. However, that’s a story for another day. What’s important to realize is that you can use Max not only to create the functionality of your program but also to create the user interface. Actually, often the two go hand in hand.
What you should be able to do by now:
- Use a toggle and switch it on and off by clicking or sending messages (0,1, bang)
- Use a metro and make it bang at a specified interval
- by using an initial argument
- by sending it messages
- Use the divide object to divide two numbers.
- Use trigger with its option of formatting the input according to the given arguments
What you should know by now:
Toggle: The toggle is a switch which can be used to switch between on (1) and off (off). You can turn the toggle on and of by clicking on it. When the toggle is turned off it sends a 0 as output and when it is turned on is sends a 1 as output. Other options to turn the toggle on and off are sending it a bang to switch the state, sending a 0 to put it off and a 1 to put it on. Its state can also be changed silently using the set-message. Whenever you send other numbers to the toggle, it just passes them on.
Metro: The metro produces bang messages automatically on a scheduled basis. Once started, metro will continue to send bang messages until stopped. You can start and stop it using a toggle. The metro can take an optional first argument which sets an initial value for the time interval in ms at which metro sends its output. For example “metro 100″will output a bang every 100 ms. Also, you can send the time interval in ms to the right inlet.
Divide: Divide divides two numbers. It receives the dividend in the left and the divsor in the right inlet. That means if you want to divide 10/2 it has to receive the 10 in the left and the 2 in the right inlet. However, as the calculation is triggered by the left inlet, it has to first receive the divisor (2) in the right and only then the dividend (10) in the left inlet. The result is send out of the outlet.
Trigger: the trigger can be used to send one input to many places, but in a clear order, progressing from the right to the left outlet. It can also format the input according to the object-argument specified. For example, “trigger b” will take the input, format it as a bang and send the bang from its outlet.